
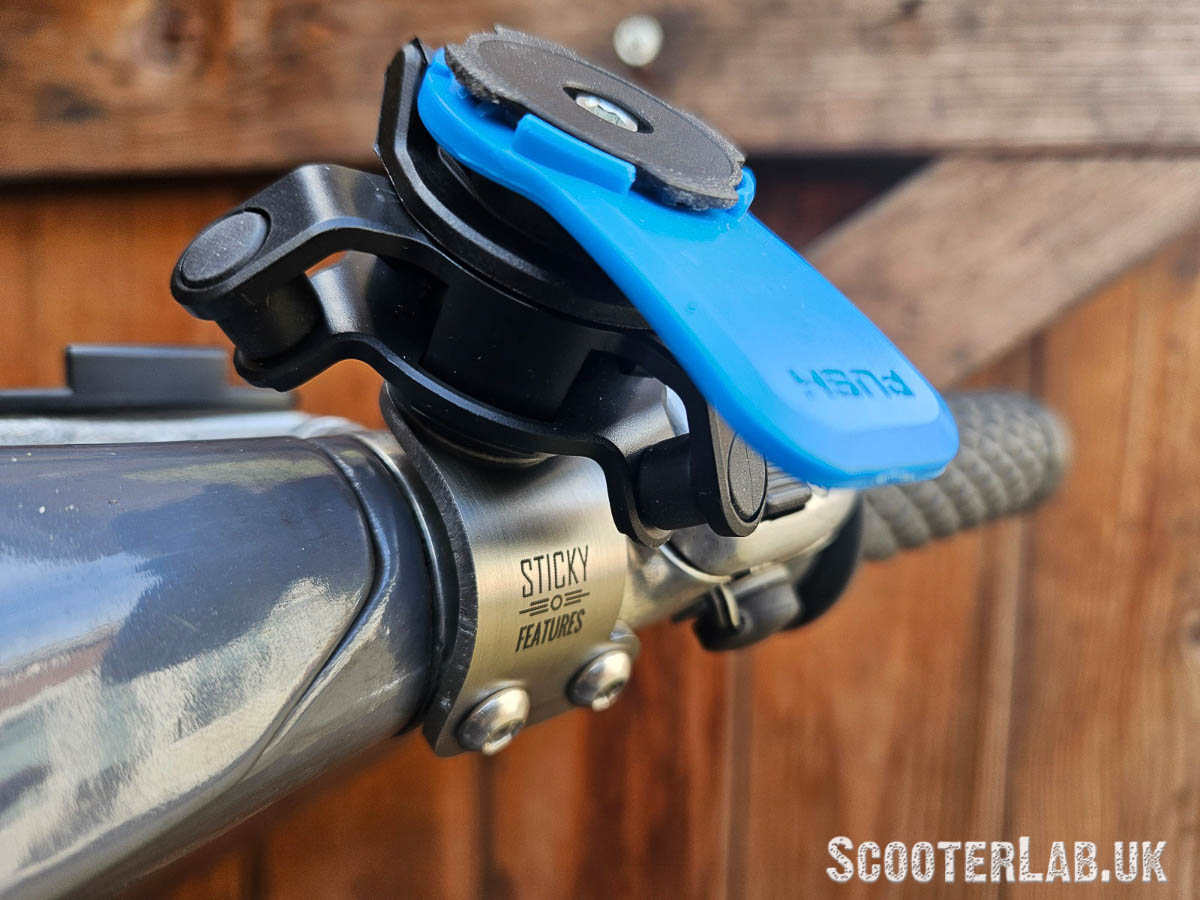

Mobile phones have taken over from a bulky sat nav for scooter navigation but there has never been a clean and simple way to mount one to a classic scooter. Until now…
Sticky first started working on a solution back in 2023 and came up with a 3D-printed bracket. It worked but people are wary about trusting their £1000 smartphone on a home-printed plastic bracket. Even though the original worked well during testing, Sticky went back to the drawing board and started work on a metal replacement.
He perfected it at the start of this year and found a reliable supplier of the extra parts he needed to turn this into a simple and affordable kit for Lambretta riders (don’t worry, a Vespa version is in the pipeline).

What’s in the kit?
- Stainless steel bracket with 3D printed positioning star: The star shape is important to prevent the plastic parts from unscrewing and coming loose
- Anti-vibration mount: Vital if you don’t want engine vibrations to shake your phone to pieces
- Twist-lock mechanism with release lever: The device attaches at any 45-degree position and locks in any 90-degree position
- Self-adhesive adaptor plate: Sticks directly to the clean flat surface of a phone or Sat-Nav using super-strong 3M adhesive: Sticky has had one of these mounted to his phone for over a year and used it on the scooter at speed with no worries
- Fasteners and Allen Keys: Stainless M6 screws attach to a Lambretta headset in place of the two original countersunk screws

Upgrades?
If you’re not happy using the self-adhesive adaptor, you can upgrade to a genuine Quad-Lock case for your mobile phone and for extra protection, you can also buy a clear waterproof ‘Poncho.’ There are also wireless chargers available for riders with a phone that supports it and have a scooter running 12v DC.
SLUK can supply all Quad Lock mounts, cases and chargers.

Fitting is simple
The kit comes complete with all fixings and two allen keys in the box. There’s also a printed instruction sheet (in colour) with images showing step-by-step fitting. It’s worth noting that if you fit one to a Series 1/2, it is slightly different due to the closeness of the light switch to the stainless steel ‘StickyFeatures’ bracket.
For an S1/2 you need to use the black plastic extension for the Quad-Lock style mount (as pictured above).


Fitting instructions
- Remove the two screws that hold your righthand switch housing in place
- Fit the ‘StickyFeatures’ stainless steel bracket using the two stainless countersunk allen bolts (supplied)
- On an S1/S2 you fit the black extension arm in your desired position
- Fit anti-vibration mount on extension arm (or bracket if you aren’t using that part)
- Fit lever/phone mount to anti-vibration mount and tighten the screw
- Check all parts are fitted correctly before use
- Clean and dry the rear of your mobile phone before fitting the self-adhesive adaptor
Note
Sticky recommends using standard Loctite on all screws before use; it’s also worth using a lanyard to secure your expensive device to your scooter – just in case.

It takes around five minutes to fit the mount to your scooter and it’s very neat and unobtrusive (certainly better than the unsightly brackets and Ram Mounts I’ve used in the past)
Twist to lock
The actual lever component and anti-vibration mounts are based on the Quad-Lock design and work in exactly the same way; you simply push your device onto the mount and twist it to lock it in place. It takes about two seconds.
To remove, push the blue lever and twist – simple.

Quick and easy
I fitted the StickyFeatures mount to Linsey’s Series 2, and I bought the Quad Lock case and poncho, so we didn’t need to use the self-adhesive mount supplied with the kit. I’ve fitted that to my mobile, though, so I can use it on Linsey’s scooter if I ride it anywhere.
We’ve both been using the mount for a few months now with no issues. Linsey loves having a safe and easy-to-use phone mount to allow her to see directions whilst she’s on the way to a rally. With this type of mount, you can use it in either landscape or portrait and it really is safe, quick and easy to use. Simply push and turn to lock it in place.

Wireless charging
I’ll probably fit a wireless charging head as well; at the minute, Linsey has been keeping her mobile charged using a lead connected to her Intelli Converter in the glovebox.
How to get one
These kits are available directly through StickyFeatures in the UK and cost £43.99. If you’re overseas, you can buy them through Rimini Lambretta Centre. If you already own a Quad Lock mount you can just buy the StickyFeatures stainless bracket and fittings for £28.
It’s worth noting that these kits are being made up individually, and supply is limited by time. Once this article goes out, it’s highly likely they’ll be showing as out of stock pretty soon. Be patient, though and keep an eye on Sticky’s website because they will be back in stock again as soon as they catch up.
What does it fit?
This mount has been designed to work with all common Lambretta handlebar switch housings (both cable and hydraulic conversions). EXCEPT Casa Performance brake setups, these use a different layout and Sticky is working on a dedicated version.